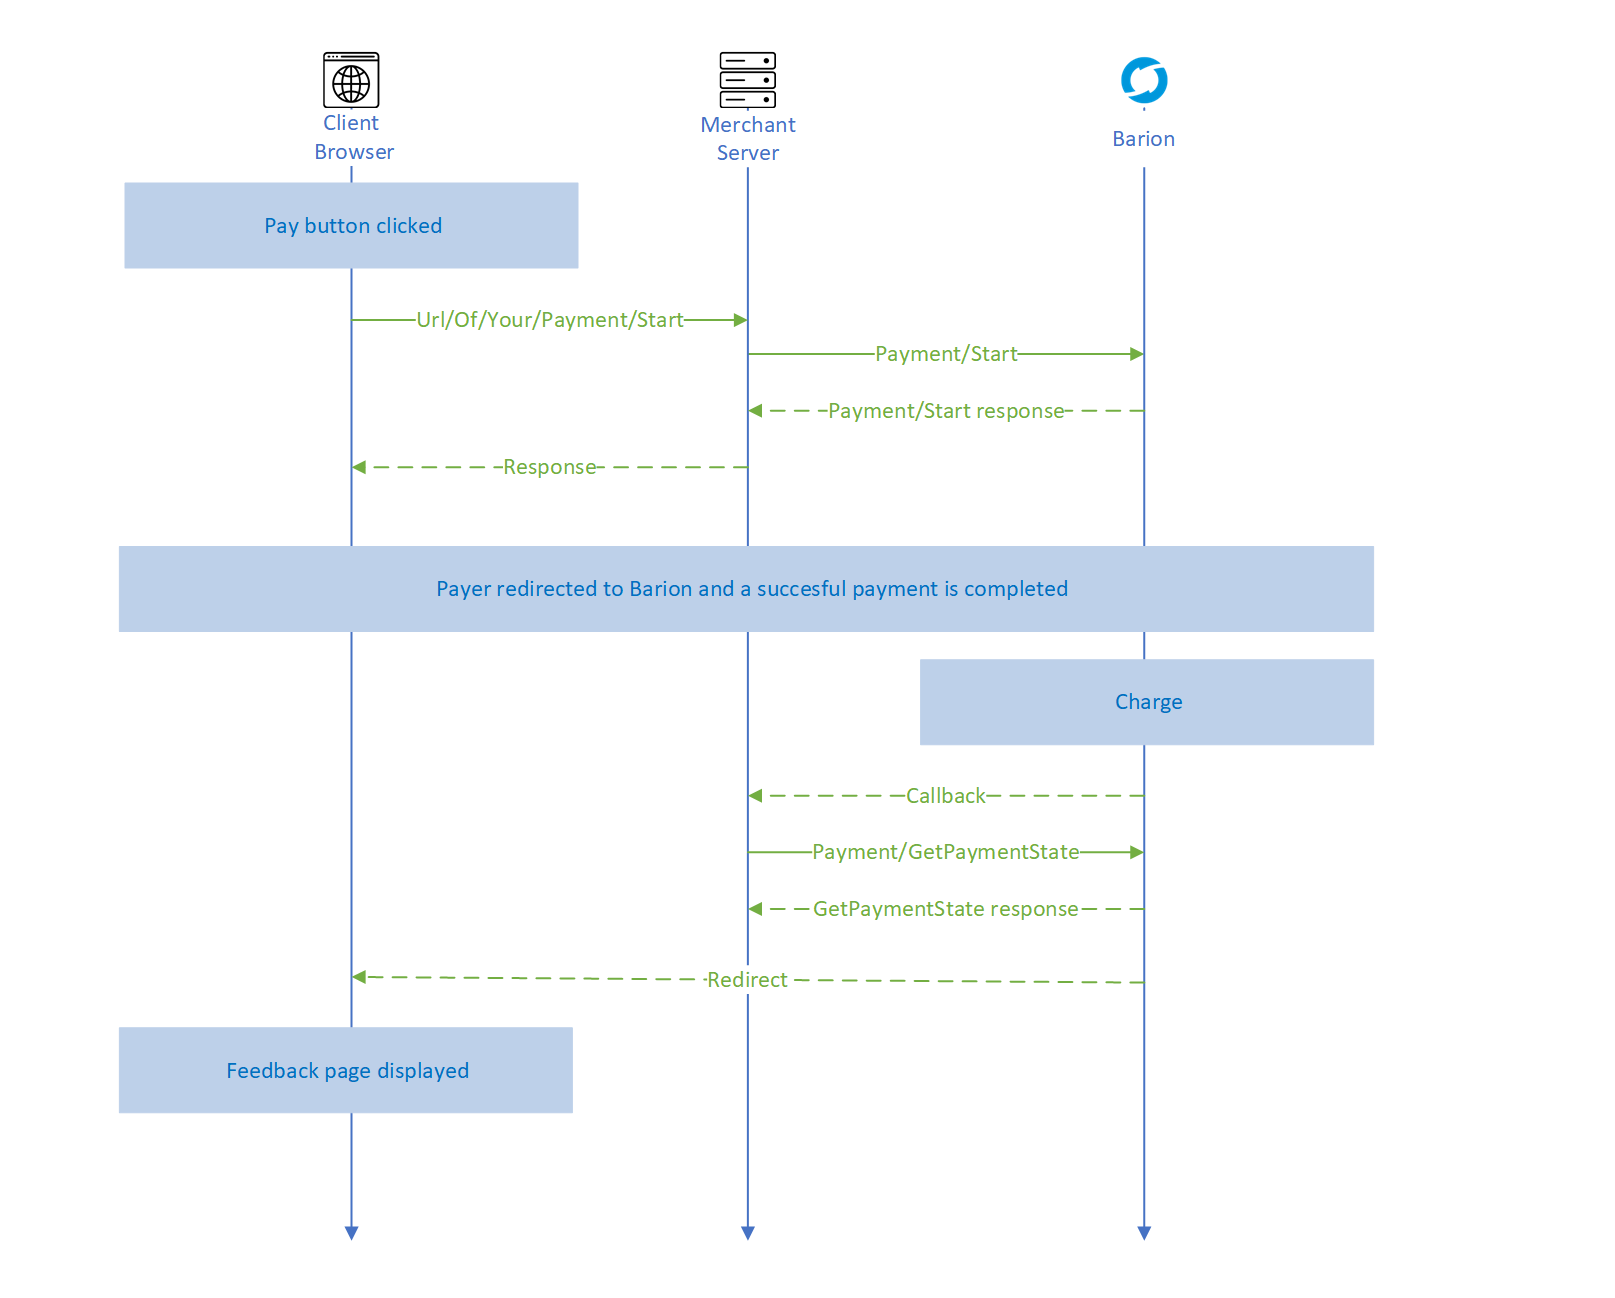
Token payment 3D Secure
Token Payment 3D Secure
This payment scenario allows the integrator shop to register a customer (and a funding source) in the Barion system and then later on charge the customer without redirecting her to the Barion Payment Gateway UI. This means that the customer authorizes the shop to charge her card or Barion balance without typing in the card information or Barion login again.
Types
Token payment can be used in two use cases:
- when the user is present on the website of the merchant and she decides to pay :
- OneClick payment: the user is charged upon her request initiated on the website of the merchant. This type of payment is subject to 3DS, the appropriate solutions should be implemented on the merchant's side (see below).
- when the merchant initiates the payment without the user being present:
- Recurring payment: the user is charged with the same amount on a regular basis. This type of payment is subject to 3DS, with exemption (meaning that challenge flow won't/can't be presented, but as much available data should be sent as possible)
- MIT (merchant initiated transaction): the user is charged on an irregular basis and/or with diffreent amount. This type of payment is not subject to 3DS.
Prerequisites
To be able to integrate your webshop with the Barion Payment Gateway:
- You must register a Barion wallet at the Barion website or in the Sandbox environment. Learn more about the Sandbox environment here.
- For this wallet you have to create a shop which should be approved by Barion.
- For every currency you plan to conduct payments in you have to make sure there is an account created in your Barion wallet. This means that if you plan to have USD payments then there should be a USD account created in your wallet.
- To make sure every corner case scenario works for your webshop it is best to topup that account with a small amount (approx. 5-10EUR or your choice of currency around the same value).
- For the technical communication guide please read this: Calling the API
The payment process
The process is divided into two major steps:
- Creating the token that represents one of the customer's funding sources (credit card or e-money wallet)
- Using the registered token to charge the customer
Creating the token
To be able to use a token payment scenario first we have to register the token with Barion. The token registration is basically a normal payment with two new properties in the Payment/Start request. This means that we have to make sure that the customer is well aware of the fact that they are giving consent to a tokenized payment. The Barion payment does not indicate in any way that the payment is a token payment.
The token is registered to the shop and not to the wallet. So if the Barion wallet has multiple shops registered the token can not be shared among them even if the customer is the same.
One of the properties is the InitiateRecurrence property. This is a bool property, if you set it to true then the payment gateway will consider the request as a token registration. This happens even if the customer is already has a registered token, so you are able to re-register a customer.
The other required property for a token registration is the token itself. This is generated by the shop and has to be unique for every registration. The token should be specified in the RecurrenceId property of the Payment/Start request. This token should be stored in the webshop database. Make sure that multiple tokens can belong to a single customer because the token is only unique for a specific shop, customer, funding source combination.
An already used RecurrenceId can be used for re-registration, in this case, the new funding source will be registered for the token.

Example JSON request
{
    "POSKey": "E31EC263-01DC-40BD-BDF1-38FC7A332434",
    "PaymentType": "Immediate",
    "PaymentRequestId": "EXMPLSHOP-PM-001",
    "InitiateRecurrence": true,
    "RecurrenceId": "SHOP-XMLP-TOKEN-ABC-123",
    "FundingSources": ["All"],
    "Currency": "EUR",
    "Transactions": [
        {
            "POSTransactionId": "EXMPLSHOP-PM-001/TR001",
            "Payee": "[email protected]",
            "Total": 25.2,
            "Comment": "Subsription fee for the first month",
            "Items": [
                {
                    "Name": "Website subscription",
                    "Description": "Website subscription for one month",
                    "Quantity": 1,
                    "Unit": "month",
                    "UnitPrice": 25.2,
                    "ItemTotal": 25.2,
                    "SKU": "EXMPLSHOP/SKU/PHC-01"
                }
            ]
        }
    ]
}
Customer selects funding source
After the proper payment preparation, the customer is redirected to the secure Barion gateway to choose between funding sources. The funding source the customer selects will be registered to the token. The funding source can either be an e-money wallet or a bank card. This means that even though the customer may own multiple cards only the one that was registered to the token can be used for future token payments. To change the funding source attached to the token a new registration should be requested.
Processing the response
The response is almost the same as to a basic Immediate scenario. The only difference is that there is the RecurrenceResult property that tells the result of the token registration. This could be either
- Successful: the token is registered and live, can be used for payment
- Failed: the token registration was not successful, the token can not be used
- None: this could only happen if no token payment was requested
Displaying the funding source in a GUI
We strongly advise to save the complete response for future reference. The FundingSource field tells if the funding source is a Barion balance or a card. If it is a card, it is useful to save FundingInformation for displaying it for the user, when requesting future payments. The usual way to display funding sources is to show the last 4 digits of the card, with the rest represented by stars, eg: **** **** **** 1234. The card used can be obtained from FundingInformation's BankCard field. The CardType field can be used to display the appropriate card logo. You can even show, if the card is expired, and offer to register another one.
Possible error responses
| Error code | Description |
|---|---|
| RecurringPaymentNotAllowed | The token payment is not allowed for the shop identified by the POSKey. Contact Barion to request this feature. |
Using the token
Prerequisits
To be able to use a token, the original payment must be in a successful state. Depending on the type of the payment, 3DS might be required. 3DS is not required in the following cases:
- the token was requested before 3DS came into effect
- the original payment was not initialized by bank card
As mentioned earlier, there are 3 types of token payments, each:
- MIT - 3DS is not required
- Recurring - 3DS is required, but with exemption (challenge flow won't be displayed, but 3DS data should be sent)
- OneClick - 3DS is required
OneClick payment
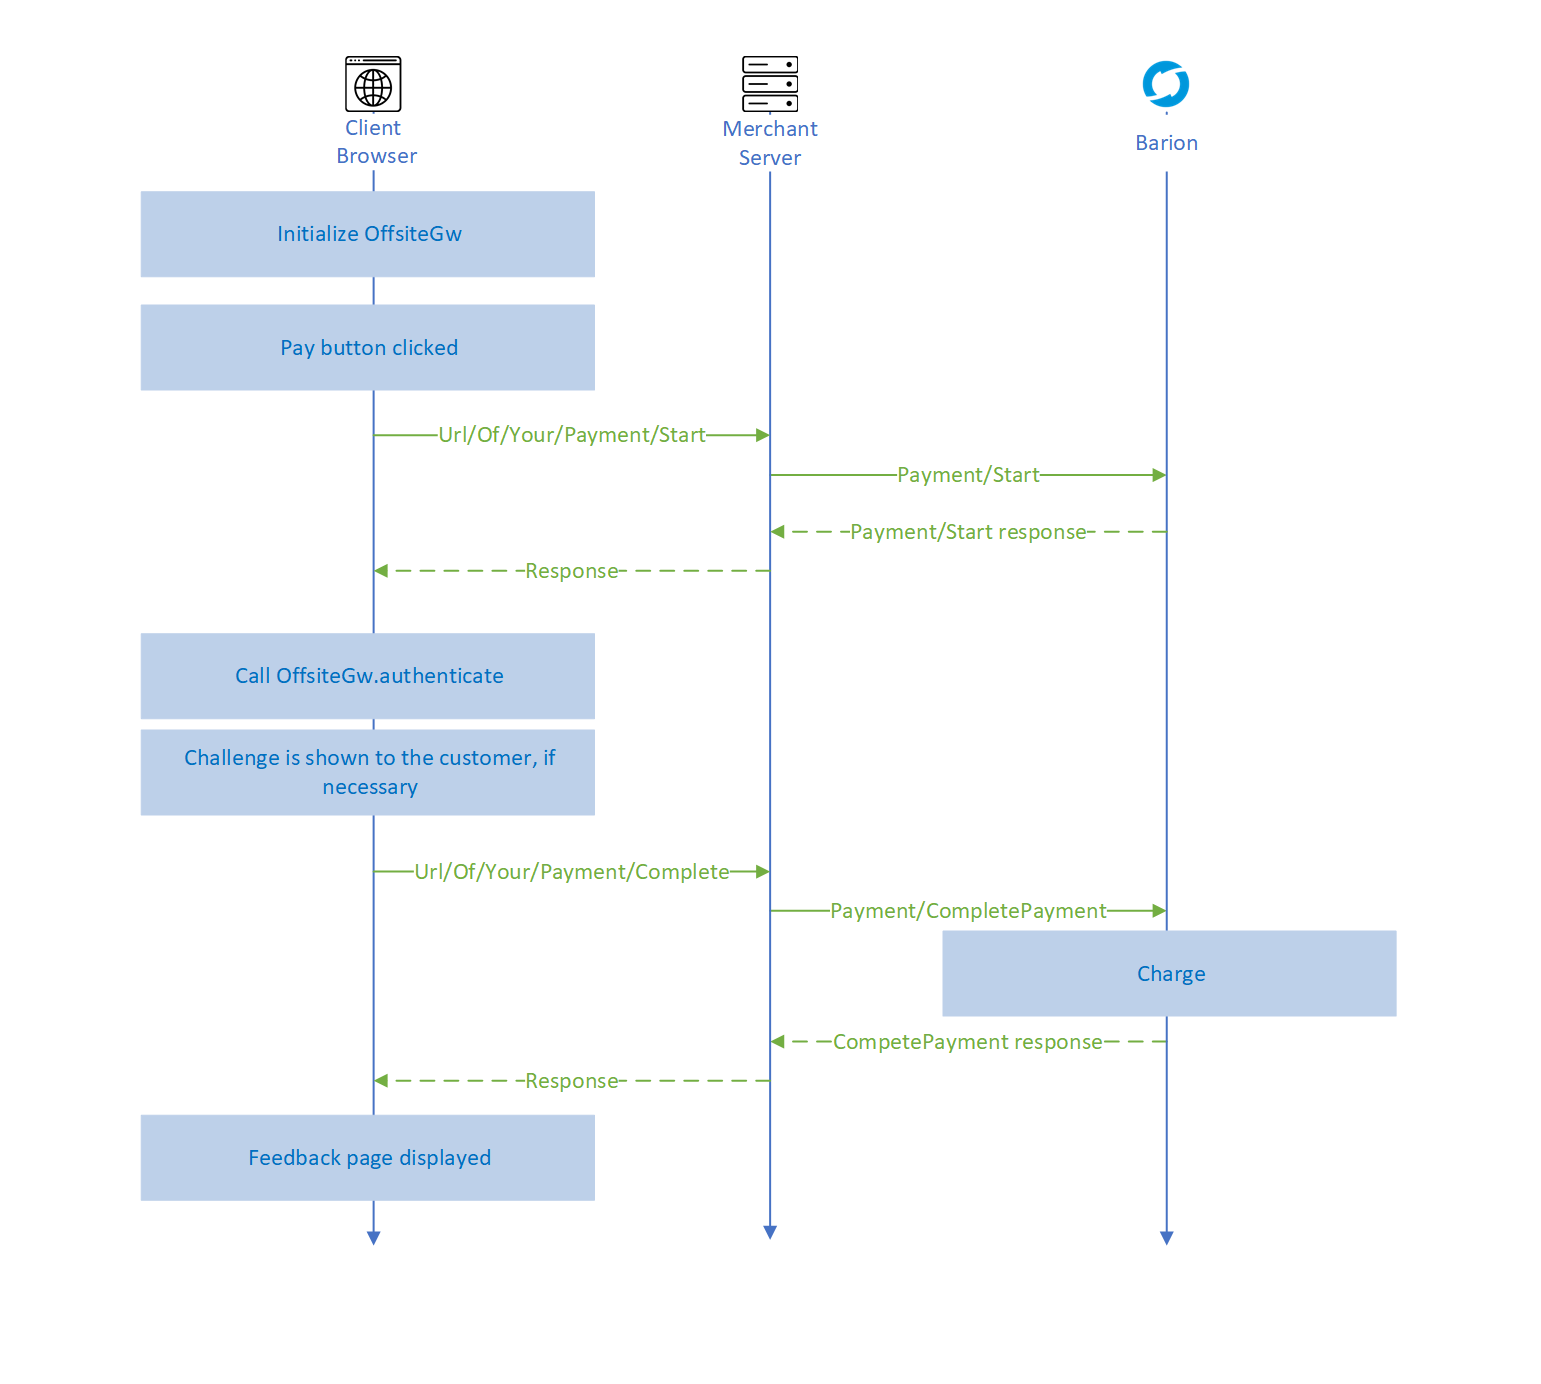
Step 1 : Initialize oneClick
You have to include the following css and javascript files in the code of your site:
<link href="https://secure.barion.com/static/barion.oneclick.min.css" rel="stylesheet">
<script src="https://secure.barion.com/static/barion.oneclick.min.js"></script>
Then you have to initialize the Barion javascript client:
const configuration = {
    onAuthenticationSucceeded: function () {
        // success callback
    },
    onAuthenticationFailed: function () {
        // failure callback
    }
}

const oneClick = new Barion.OneClick(configuration);
Step 2 : Make a payment
To use an already registered token for a payment, you have to call the same /Payment/Start API endpoint but the InitiateRecurrence should be set to false and the appropriate Recurrence Type should be sent. This tells the Barion API to use the token for payment instead of only registering it. The token should be specified in the RecurrenceId property.

Example Payment/Start json request
{
    "POSKey": "E31EC263-01DC-40BD-BDF1-38FC7A332434",
    "PaymentType" : "Immediate",
    "PaymentRequestId": "EXMPLSHOP-PM-002",
    "InitiateRecurrence" : false,
    "RecurrenceType" : "OneClickPayment",
    "RecurrenceId" : "SHOP-XMLP-TOKEN-ABC-123",
    "FundingSources": ["All"],
    "Currency": "EUR",
    "Transactions": [
        {
            "POSTransactionId": "EXMPLSHOP-PM-002/TR002",
            "Payee": "[email protected]",
            "Total": 25.2,
            "Comment": "Subsription fee for the second month",
            "Items": [
                {
                    "Name": "Website subscription",
                    "Description": "Website subscription for one month",
                    "Quantity": 1,
                    "Unit": "month",
                    "UnitPrice": 25.2,
                    "ItemTotal": 25.2,
                    "SKU": "EXMPLSHOP/SKU/PHC-01"
                }
            ]
        }
    ]
}
Processing the Payment/Start response
To this request, the Barion API sends back the required data for the 3DS authentication for the specified paymentId.
| Field name | Description |
|---|---|
| PaymentId | Payment Identifier of the purchase in Barion |
| ThreeDSAuthClientData | basae64 encoded 3DS client data |
Example response:
{
    "PaymentId" : "dce46843-6266-4c1f-b82a-387e0fee9073",
    "ThreeDSAuthClientData" : "ewoJIkNhcmRQdWJsaWNJZCI6ICIxYTE5M2E1NDQzNDI0YjJiOGJiMjMyOGRhNWY4NmYzYiIsCgkiUGF5bWVudElkIjogImRjZTQ2ODQzNjI2NjRjMWZiODJhMzg3ZTBmZWU5MDczIiwKCSJPbmV
DbGlja0NvbnRlbnRVcmwiOiAiaHR0cDovL3NlY3VyZS5iYXJpb24uY29tL3RocmVlZHMvb25lY2xpY2twYXltZW50IiwKCSJBQ1NTdGFydFByb3RvY29sVmVyc2lvbiI6ICIyLjEuMCIsCgkiQUNTRW5kUHJvdG9jb2xWZXJzaW9uIjogI
jIuMS4wIiwKCSJEU1N0YXJ0UHJvdG9jb2xWZXJzaW9uIjogIjIuMS4wIiwKCSJEU0VuZFByb3RvY29sVmVyc2lvbiI6ICIyLjIuMCIsCgkiVGhyZWVEU1NlcnZlclRyYW5zSUQiOiBudWxsLAoJIlRocmVlRFNNZXRob2RVUkwiOiBudWx
sLAoJIlRocmVlRFNNZXRob2REYXRhRm9ybSI6ICJleUowYUhKbFpVUlRUV1YwYUc5a1RtOTBhV1pwWTJGMGFXOXVWVkpNSWpvaWFIUjBjSE02THk4elpITXVZbUZ5YVc5dUxtTnZiUzh6WkhNdmRqSXZNMlJ6TFcxbGRHaHZaQzF1YjNSc
FptbGpZWFJwYjI0aUxDSjBhSEpsWlVSVFUyVnlkbVZ5VkhKaGJuTkpSQ0k2SWpFNE5URTJPR0kxTFRKalkyUXROR0kxWlMxaVlqWm1MVFUzTW1VM00yVTNNemt3TnlKOSIsCgkiRXJyb3JEZXRhaWxzIjogbnVsbCwKCSJWZXJzaW9uIjo
gIjIuMS4wIgp9Cg=="
}
Step 3: 3DS authentication & challenge
This data then should be passed onto the BarionThreeDSecure.startProcess method, which will do all the magic to authenticate and display the challenge (if needed).
        $.ajax({
            url: "Url/Of/Your/Payment/Start",
            method: "POST",
            data: data,
            success: function (resp) {
               if (resp.ThreeDSAuthClientData != null && resp.ThreeDSAuthClientData !== "") {
                  oneClick.startProcess(resp.ThreeDSAuthClientData);
               } else {
                  if (resp.Errors === null || resp.Errors.length === 0) {
                     // success
                  }
               }
            }
         });
When the request is finished the appropriate callback is fired, the BarionClient was initialized with in Step 1. Finally after receiving the successful authentication event, you have to call our /Payment/CompletePayment endpoint, where the actual charge will happen.
Possible error responses
| Error code | Description |
|---|---|
| InvalidRecurrenceId | The token specified in the RecurrenceId is invalid. Check if the token registration was successful.
|
| RecurringPaymentDenied | Something happened to the user since the token registration, either deleted, suspended, or blocked. The payment s not allowed in these cases. |
| InsufficientFunds | If the original payment was with an e-money wallet and the customer doesn't have enough money to fulfill this charge this error happens. |
| OriginalPaymentWasntSuccessful | This means that the token belongs to an originally unsuccessful payment so this token can not be used anymore. This could only happen if the original payment was financed with a credit card. |
| InvalidCurrency | If the original payment was paid with e-money and the current token payment is in a currency that the wallet does not have an account in this error happens. |