App2App integration with ios library
In this type of integration, you don't need to edit your server-side (aside from the Universal link modifications). In your mobile application, you don't have to implement network communication. We already did it for you. If you use the Barion Android library you have to add a few lines of code to your existing codebase. The disadvantage of this is that you have to notify your own server-side about the payments and your mobile app can contain the POSKey.
Downloads, example
You can download the Barion iOS Library from Barion's Github page.
You can download the example project from Barion's Github page.
The library contains the necessary models, so you don't need to implement them.
Integration steps
0. step - Setup Universal link
In order to the Barion mobile application to redirect the user to the integrator mobile application, you have to put one file into your website's root directory. Your website have to support HTTPS protocol. Simply put a file into your website's root directory with apple-app-site-association name and don't write an extension to it. This file’s content should be something like this:
   {
      "applinks":{
         "apps":[],
         "details":[
            {
               "appID":"[your ios team id].[your application's bundle id]",
               "paths":[
                  "*"
               ]
            }
         ]
      }
   }
You can find your Team ID on this site: Organization Profile
Here you are a real example on our website.
You can read more about Universal link in Apple's documentation The Universal Link doesn't work in simulator!
1. step - Setup your iOS application for Universal links
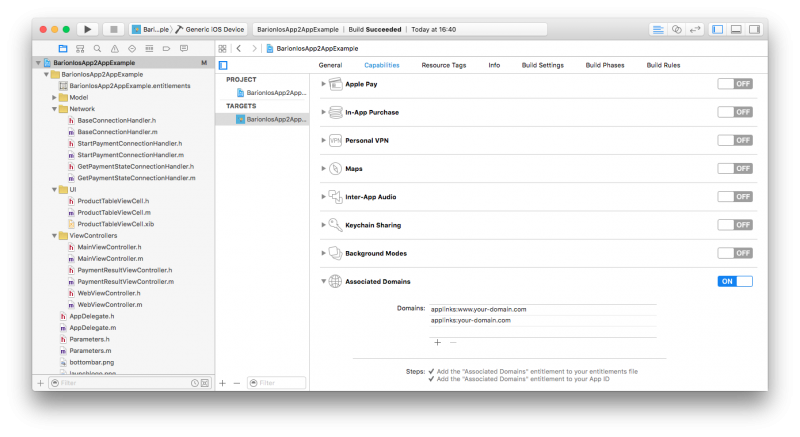
Open the XCode, select your project and the target. Select the Capabilities tab and find the Associated Domains section! You need to add that domains that you have written in the 0.2 step:

As a result, this will generate a [ProjectName].entitlements file.
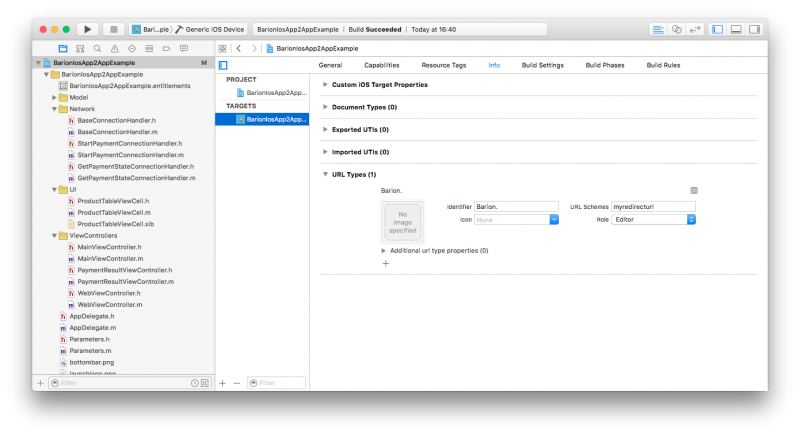
2. step - Setup your application to handle your own scheme.
Switch to the Info tab, and open the URL Types section! Add your own url scheme just like on this image.

3. step - Add Barion iOS library to your project
You can download the required files from Barion's Github page.
Copy the libBarioniOSLibrary.a and the BarionBundle.bundle files into your project's root directory. Copy the include directory into your project directory. Pay attention that the Copy items if needed and the Create folder references settings should be on.
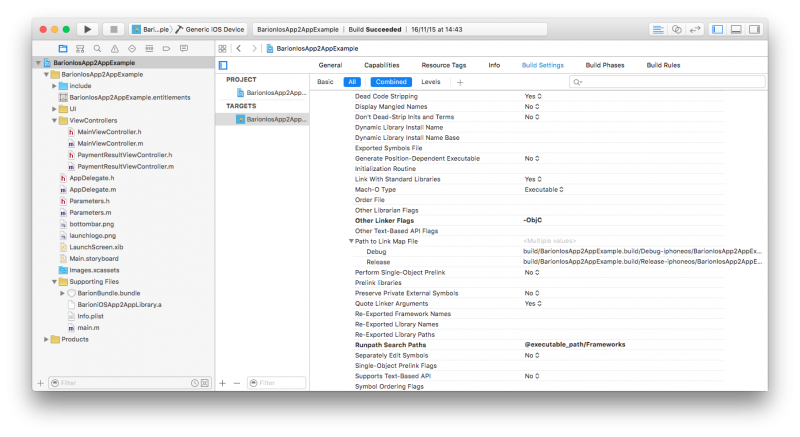
Select your project and the target. Find under the Build settings tab the Other Linker Flags option and add this -ObjC to it.

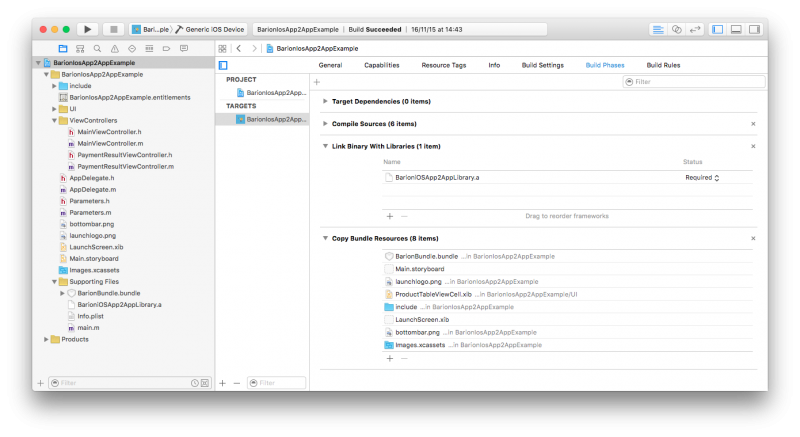
Check on the Build Phases tab that the Link Binary With Libraries section contains the libBarioniOSLibrary.a file, and in the Copy Bundle Resources section contains the include directory and the BarionBundle.bundle file.

4. step - Start payment
You need to implement the BarionLibraryDelegate protocol in that UIViewController, which will start the payment.
   // MainViewController.h
   #import <UIKit/UIKit.h>
   #import "../include/BarioniOSLibrary/LibraryViewController.h"

   @interface MainViewController : UIViewController <UITableViewDataSource, UITableViewDelegate, BarionLibraryDelegate>
   {
      NSArray* _products;
   }

   - (IBAction)payWithBarion:(id)sender;

   @end
Import the required headers in the MainViewController.m file!
   #import "include/BarioniOSLibrary/PaymentSettings.h"
   #import "include/BarioniOSLibrary/TransactionModel.h"
   #import "include/BarioniOSLibrary/Product.h"
Implement the payWithBarion method. Initiate the payment and the library controller.
   - (IBAction)payWithBarion:(id)sender
   {
      NSMutableArray* result = [NSMutableArray new];
      [_products addObject: [[Product alloc] initUsingBlock:^(Product *product) {
         product.name = @"The history of money";
         product.productDescription = @"The evolution of money from the stoneage to Barion";
         product.quantity = 1;
         product.unit = @"db";
         product.price = 40;
         product.itemTotal = 40;
         product.SKU = @"APP2APP_PENZTORT";
      }]];
      [_products addObject: [[Product alloc] initUsingBlock:^(Product *product) {
         product.name = @"How to make a fortune with Barion";
         product.productDescription = @"Tips to get rich";
         product.quantity = 1;
         product.unit = @"db";
         product.price = 20;
         product.itemTotal = 20;
         product.SKU = @"APP2APP_GETRICH";
      }]];
      [_products addObject: [[Product alloc] initUsingBlock:^(Product *product) {
         product.name = @"The beginners guide to accepting bank cards";
         product.productDescription = @"How to become bank card acceptors in five minutes with Barion";
         product.quantity = 1;
         product.unit = @"db";
         product.price = 140;
         product.itemTotal = 140;
         product.SKU = @"APP2APP_BEGGUIDE";
      }]];

      TransactionModel *transactionSettings = [[TransactionModel alloc] initUsingBlock:^(TransactionModel *settings){
         settings.posTransactionId = @"TEST-01-App2App";
         settings.payee = [Parameters examplePayee];
         settings.total = [self getProductsTotal];
         settings.comment = @"Barion app2app ios library";
      }];

      PaymentSettings *paymentSettings = [[PaymentSettings alloc] initUsingBlock:^(PaymentSettings *settings){
         settings.posKey = [Parameters posKey];
         settings.paymentTypeEnum = Immediate;
         settings.guestCheckOut = YES;
         settings.debugMode = YES;
         settings.locale = @"hu-HU";
         settings.fundingSourceEnum = All;
         settings.redirectUrl = [Parameters redirectUrl];
         settings.redirectUrliOS9 = [Parameters redirectUrl];
      }];

      UIStoryboard *sb = [UIStoryboard storyboardWithName:@"LibraryMain" bundle:
         [NSBundle bundleWithURL:[[NSBundle mainBundle] URLForResource:@"BarionBundle" withExtension:@"bundle"]]];
      ((AppDelegate*)[UIApplication sharedApplication].delegate).libraryViewController = (LibraryViewController*)[sb instantiateInitialViewController];
      ((AppDelegate*)[UIApplication sharedApplication].delegate).libraryViewController.delegate = self;
      ((AppDelegate*)[UIApplication sharedApplication].delegate).libraryViewController.productList = [_products mutableCopy];
      ((AppDelegate*)[UIApplication sharedApplication].delegate).libraryViewController.transactionSettings = transactionSettings;
      ((AppDelegate*)[UIApplication sharedApplication].delegate).libraryViewController.paymentSettings = paymentSettings;
      [self presentViewController: ((AppDelegate*)[UIApplication sharedApplication].delegate).libraryViewController animated:YES completion:nil];
   }
If there was an error in your payment initiation, you will be notified through the barionLibraryStatus method:
- (void)barionLibraryStatus:(NSMutableDictionary *)responseAfter this the library will automatically open the Barion mobile application or redirect the user to Barion's website.
5. step - Handling redirect
Add these methods to your application's AppDelegate.m file:
   -(void)applicationWillEnterForeground:(UIApplication *)application {
    NSString *paymentId = ((AppDelegate*)[UIApplication sharedApplication].delegate).libraryViewController.paymentId;
    if (paymentId != nil) {
        [LibraryViewController getPaymentStateWithPaymentId:paymentId withPOSKey:[Parameters posKey] inDebugMode:[Parameters debugMode] andWithCallback:^(NSDictionary* response){
            NSLog(@"continue block runned");
            [self openPaymentResultViewControllerWithPaymentId:paymentId orWithUrl:nil];
            ((AppDelegate*)[UIApplication sharedApplication].delegate).libraryViewController = nil;
        }];
    }
   }


   - (void)openPaymentResultViewControllerWithPaymentId:(NSString*)paymentId orWithUrl:(NSURL*)url {
      UIStoryboard* sb = [UIStoryboard storyboardWithName: @"Main" bundle:nil];
      PaymentResultViewController* result = [sb instantiateViewControllerWithIdentifier:@"paymentResultViewController"];
      result.paymentId = paymentId;
      result.url = url;
      result.modalTransitionStyle = UIModalTransitionStyleFlipHorizontal;
      UINavigationController* controller = (UINavigationController*)self.window.rootViewController;
      [[controller presentedViewController] dismissViewControllerAnimated: YES completion:^{
          [controller setViewControllers: [NSArray arrayWithObject: result]];
      }];
   }
6. step - Get payment's status
After the user returns your application, you should get the payment's status. In this example we use PaymentResultViewController class for this.
   // PaymentResultViewController.h
   #import <UIKit/UIKit.h>
   #import "GetPaymentStateConnectionHandler.h"

   @interface PaymentResultViewController : UIViewController <GetPaymentStateConnectionHandlerDelegate>
   {
      GetPaymentStateConnectionHandler* _getPaymentStateHandler;
   }

   @property (nonatomic, retain) NSURL* url;
   @property (nonatomic, retain) NSString* paymentId;

   @end

   // PaymentResultViewController.m
   #import "PaymentResultViewController.h"
   #import "BarionError.h"
   #import "BarionGetPaymentStateResponse.h"
   #import "Parameters.h"

   @implementation PaymentResultViewController

   - (void)viewDidLoad {
      [super viewDidLoad];

       if (self.url != nil) {
           [LibraryViewController getPaymentStateWithUrl:self.url withPOSKey:[Parameters posKey] inDebugMode:[Parameters debugMode] andWithCallback:^(NSDictionary* response){
               // The response dictionary contains the payment details
           }];
        } else if (self.paymentId != nil){
           [LibraryViewController getPaymentStateWithPaymentId:self.paymentId  withPOSKey: [Parameters posKey] inDebugMode: [Parameters debugMode] andWithCallback:^(NSDictionary* response){
              // The response dictionary contains the payment details
           }];
        }
   }

   @end
From the dictionary you can easily get the payment details.